All posts by annai881

Project Ideas for LEDs and 3D Prints

Brainstorming Ideas:
1. Light-up geometric paperweight 2. Light-Up Fridge/ Board Magnet (that has hooks so it can hold things up) 3. Light-up tissue box

Table Top 5:
1. Tissue Box (lights up when you pull out a tissue)
2. Nightlight with Darkness sensor
3. Geometric Paperweight
4. Flashlight
5. Belt Buckle

Table (2) Top 4:
1. Lit-up Halloween Jack-o-Lantern
2. Lit-up Coffee Cup with Temperature Sensor
3. Table Edge Cover with Lights (table cloth will lights on the edge)
4. Lit-up glasses

LED it Up!

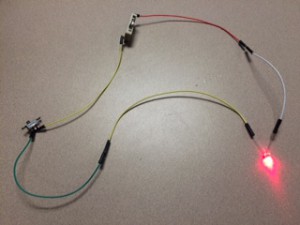
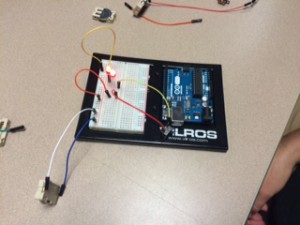
After exploring and experimenting with LED lights, cables, and bread boards, much concerning the topic was learned. First, we experimented with just wires and a coin battery. I learned the differences between positive and negative sides of the battery, and how to connect the wires. I also learned through this experimentation that there are three different basic types of wires: female-female, male-male, and male-female. The female-female wires had two openings on either side, the male-male wires had two small metal pieces on either side which fit into the female-female openings, and female-male which had an opening on one side and a wire on the other side. In addition, I learned about what a bread board was and how it functions. A bread board is a small plastic board which has many small holes on the exterior. However, below the outer layer which is plastic, there are strips of metal. Each row of small holes are all connected by one strip of metal. Therefore, when you plug in the wire into two different holes on the same line of small holes, it will create a closed circuit.

Below are pictures from some of the experiments that were performed with the LED lights:

LED Lights 1 LED lights


Creative Creations: Small Bucket and USB Holder

The entire process of began with the idea to construct a carrier for the USBs which randomly were placed around the room– easy to get lost. We first began brainstorming ideas on which would be the most effective tool which could also serve for different purposes. We came up with different designs. The first being a mobile stand which had the shape of a cross. There would be hooks for the USBs, but we figured the plastic wouldn’t provide a strong base (since we had to print it on the 3D printer), therefore, that idea was thrown out. The third idea which was proposed was a heart which would be attached the wall with hooks, but that was immobile which wouldn’t come in handy. The third idea was proposed: a small box with hooks on the back so it could hang and easily be removed from the metal cage. Hooks would be placed on the outside of the box so that the USBs could hang there, and small miscellaneous items could also be placed inside of the box if desired.

The process of building the box on SketchUp wasn’t as easy as it seemed. We struggled with creating all the details and makings things work. However, we pulled through and we created the SketchUp. Before we began creating our SketchUp we had to take measurements, so that the hooks would fall in the right places on the cage. At the end, we made the box a turquoise blue.

USB holder2

Learning SketchUp

During these few days of Art & Design, we have played around with SketchUp and learned how to create chairs with designs on the back of them and tables. Learning about the “push-pull” tool and how we can rotate things, draw shapes, and how to put certain designs on objects such as water, grass, wood, or stone. We created a whole dining room!

Chair and Table Creation Sketchup