All posts by megant932

Project Ideas with LEDs and 3D Printer

My partner(s) and I have brainstormed these ideas:

  • Light up pencil holder
  • Light up Jack-o-Lantern (create pumpkin using 3D printer and outline cutouts with LEDs)
  • Light up cup holder
  • Kid’s toy
  • Light up finger plate
  • Sign (Open or Exit)
  • Light up glasses
  • Trashcan basketball hoop

Top 4 table ideas:

  • Trashcan basketball hoop
  • Jack-o-lantern
  • Magical Box
  • Sign (Open or Exit)
  • T-Rex with lighted eye
  • Table Catapult with light
  • Small Christmas tree
  • Light up Etch a sketch by touch
  • Twister game
  • Light sabers
  • Impossible box – human turns switch on, and box turns itself off

LED it up!

While learning about circuits the first thing that we did was learn about how to light up LEDs using a coin battery. To light up the LED we plugged in the positive wire to the positive side, then we did the same with the negative. We connected the jumper cables to the LED and made them light up. After this, we watched a video explaining how to create a simple circuit. We used this diagram to create a simple circuit with a switch and came out successful. Next, we connected the positives and negatives on the breadboard and made the LEDs light up. We used jumper cables and male and female connectors. We learned that the two parts of the breadboard that were split up are not connected, but we can connect them by using jumper cables, in case we needed to add more lights to the breadboard. Lastly, we learned how to make a diagram for a circuit with a resistor. It is like the normal simple circuit diagram but, a little bit more complicated.

Overall, I think that we learned a lot about how to create circuits using coin batteries, jumper cables, male to female cables, a breadboard, and a switch. I think that in the future I would be able to successfully light up LED lights on my own.

circuits
Lighting LED’s with a coin battery
Circuits 2
Simple circuit on a breadboard with a switch
Circuits 3
Lighting up LED with a switch circuit
Circuits 9
Lighting up multiple LED’s on a breadboard on both parts using jumper cables

The Rescue Pencil Holder

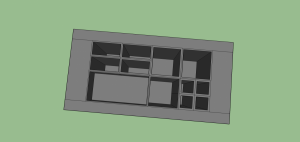
When your trying to find measurements, and are writing them down for a split second you put your pencil down, pull out your ruler and measure. After that short amount of time you turn back around, and “boom,” your pencil is gone. It rolled off the table and now you have to spend 5 minutes trying to find it. Well, my partner and I designed the pencil holder that comes to the rescue. This pencil holder has many compartments and different levels for holding different things. It holds erasers, pencils, pens, and anything you want to put inside it. Even though this sounds like the most amazing object to design ever, when designing we came into some problems. It was very challenging to get the pencil holder with rounded edges, so we had to change our design a little. We had to make the pencil holder a little smaller with a longer lip. This way, we could keep all of the lips the same length on the table, but we had to change our measurements just a little bit. We also played around with how long each of the levels were. We started with the longest edge being 7 inches, but looking at the design in SketchUp we realized that 7 inches was probably a little long, and this way the pencil wouldn’t be sticking up out of the table at all which would be a little bit of a hassle. We changed the length from 7 inches to 4.5 inches which we thought would be the best length to hold the pencils, so while it still went below the table, the pencil was still able to stick out of the top. Each of the compartments in the pencil holder we made equal, so that the pencil holder wouldn’t look asymmetrical or sloppy. We soon learned that using Ctrl Z on the keyboard was a life saver. Anytime that we didn’t get a compartment right, or forgot to add guidelines and we just starting free drawing, we knew our best friend Ctrl Z would always be there. The last thing that we did to perfect our pencil holder was change the colors. This alone took us 20 minutes because we always forget the inside walls of the pencil holder. We would orbit around the whole object checking to make sure we didn’t leave out one spot, which in our eyes would make the pencil holder look unfinished. In the end, we are very confident about this design and are very excited to start using the pencil holder which comes to the rescue. Next time you need to put your pencil down for a few seconds, don’t fear the pencil holder will be near.


Pencil Holder


Learning SketchUp

While working with SketchUp I learned how to move things around and rotate. I did not how to rotate at all when I first started using SketchUp, and by the end I could move chairs upside down, flip over tables, and do so much more. I also learned about the push/pull tool and how you can make cutouts in different objects. Sometimes the push/pull tool acted out, so I also learned how to move around the difficulties and delete the insides while push/pulling. By the end of the class of the dining room table I learned how to navigate my way through SketchUp.

Sketchup Chair